The MSDTC Handshake: Wiring an Azure VM to SQL Managed Instance
How to explain the two-way MSDTC handshake and Azure SQL Managed Instance DNS setup to stakeholders in 5 minutes.
I recently had to help a customer migrate their on-premises environment to Azure. The system had existed for quite some time and was using MSDTC (Microsoft Distributed Transaction Coordinator) to coordinate transactions across services and the database.
For their architecture and operational needs, the best-suited solution for their database tier was Azure SQL Managed Instance (SQLMI). It is a solid choice to cut down on maintenance costs, patching, and infrastructure management.
However, moving to a managed service comes with specific cloud caveats—most notably, the inability to use NetBIOS for the Windows VM and SQLMI to find each other.
Microsoft’s documentation is straightforward and provides a step-by-step guide on how to configure DTC. But every time I tried explaining the setup during handover meetings and stand-ups, I had the distinct feeling people left more confused than when they arrived.
To bridge that gap, I came up with a simple way to explain the handshake to non-technical and mixed stakeholders in under five minutes. Here is how that conversation plays out across the network.
The Handshake Breakdown
Here are the key components involved in the communication:
- Windows VM: The application server initiating distributed transactions.
- Firewall / NSG: Network security controls between the subnets (allowing required ports).
- Azure SQL Managed Instance (SQLMI): The managed database coordinating the transaction.
- Azure Private DNS Zone: Internal name resolution across the Virtual Network.
Step 1: Initial Call to SQLMI
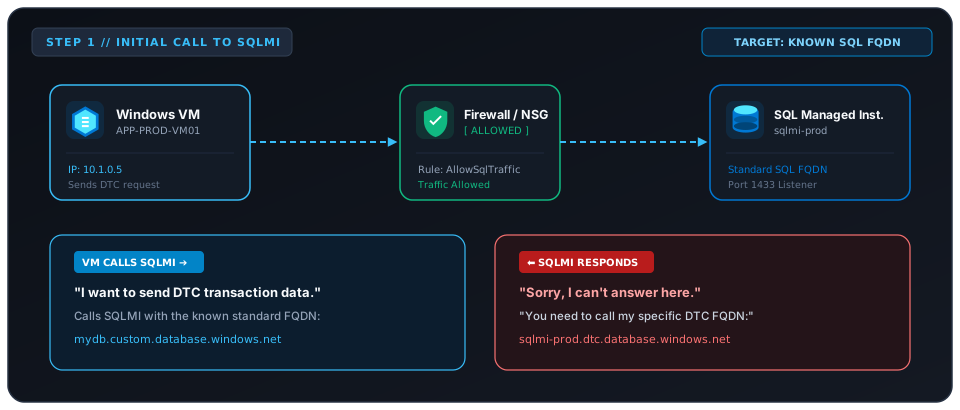
Let’s assume our VM wants to send DTC data to the SQLMI. It calls the SQLMI with the known standard FQDN (mydb.database.windows.net). The call passes through the Firewall/NSG (given traffic is allowed), and SQLMI responds:
SQLMI: “Sorry, I can’t answer here. You need to call my specific DTC FQDN.”
Step 2: The VM Cannot Find the DTC FQDN
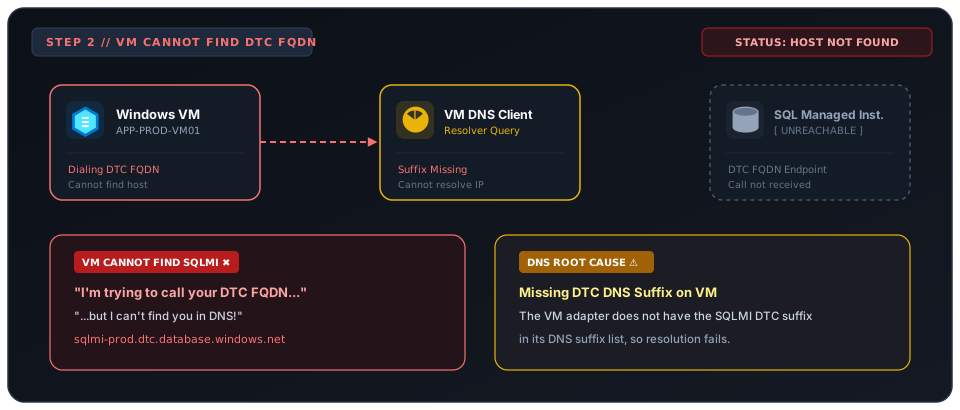
The VM then tries to call the SQLMI on the DTC FQDN (sqlmi-prod.dtc.database.windows.net), but it cannot find the SQLMI:
VM: “I’m trying to call your DTC FQDN, but I can’t find you in DNS!”
Because the SQLMI DTC suffix is not in the VM’s DNS search list, name resolution fails.
Step 3: Add SQLMI DTC DNS Suffix on the VM
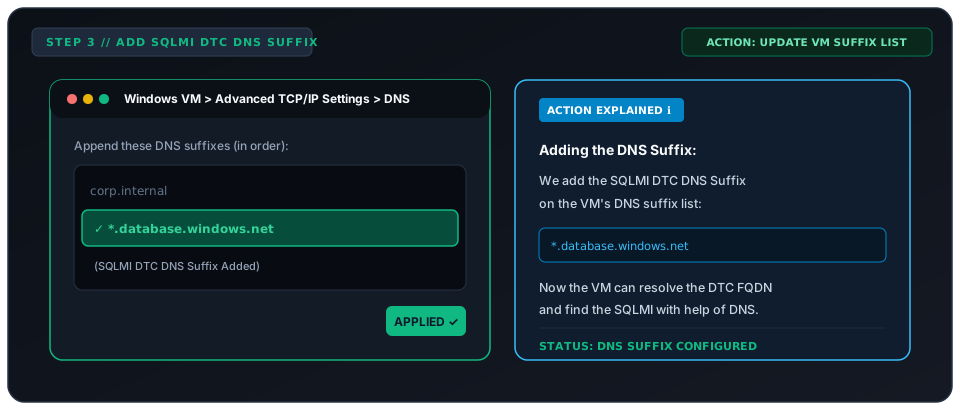
We then add the SQLMI DTC DNS Suffix (e.g. *.database.windows.net) to the VM’s DNS suffix list under Advanced TCP/IP settings.
Now the VM’s DNS resolver knows how to complete and resolve the full DTC endpoint.
Step 4: The VM Calls the DTC FQDN Again
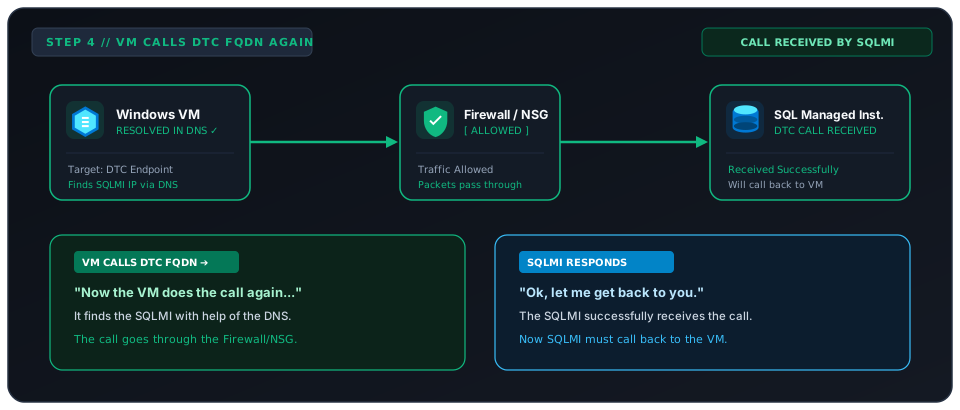
Now the VM makes the call again to the SQLMI DTC FQDN. It finds the SQLMI with the help of DNS, the call goes through the Firewall/NSG, and the SQLMI successfully receives it:
SQLMI: “Ok, let me get back to you.”
SQLMI has received the transaction, but MSDTC requires mutual verification—SQLMI must now initiate a return call back to the VM.
Step 5: SQLMI Tries to Call Back to the VM
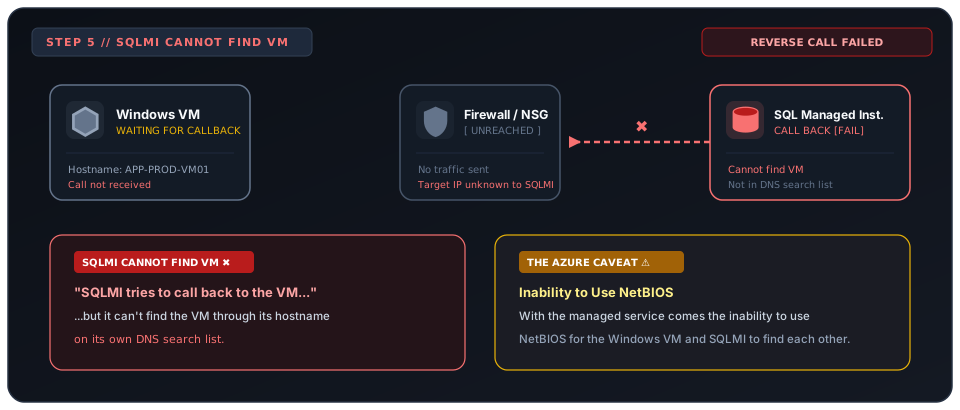
The SQLMI tries to call back to the VM using the VM’s bare hostname (APP-PROD-VM01). But it cannot find the VM through its hostname on its own DNS search list:
SQLMI: “I’m trying to call back to your hostname, but I can’t find you on my DNS search list!”
In an on-premises datacenter, machines relied on NetBIOS broadcast to shout names across the subnet. In Azure, SQLMI lives in an isolated PaaS boundary where NetBIOS broadcast does not exist. Without DNS, the return call fails and the transaction hangs.
Step 6: Private DNS Zone and SQLMI Search List
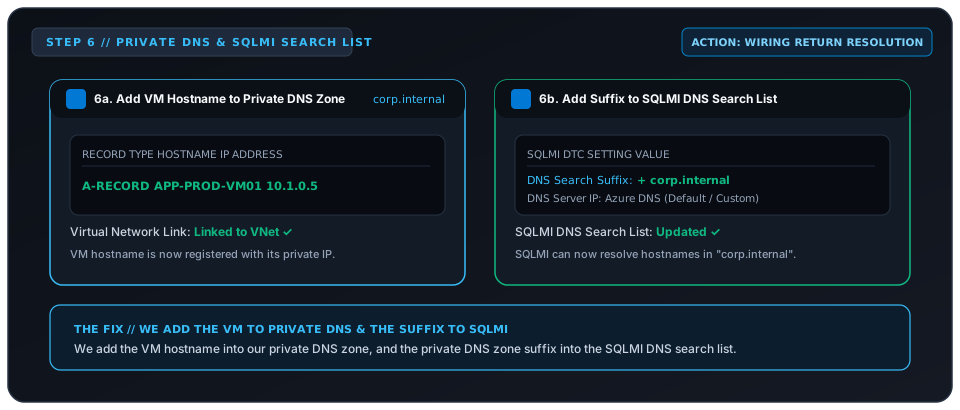
To enable the return call, we do two things:
- Add the VM hostname and private IP into an Azure Private DNS Zone (e.g.
corp.internal). - Add the private DNS zone suffix (
corp.internal) into the SQLMI DNS search list.
Now SQLMI has both the hostname record in DNS and the search suffix in its resolver list.
Step 7: SQLMI Calls the VM with Its Hostname
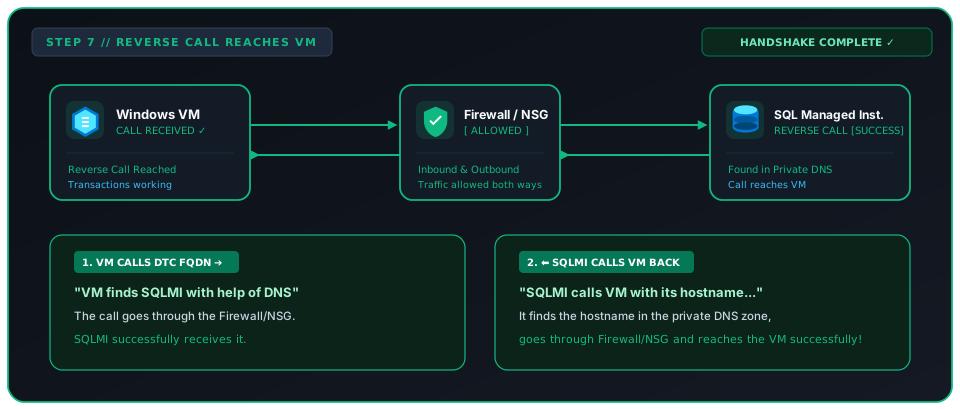
Now the SQLMI tries to call the VM again using its hostname. It finds the hostname in the private DNS zone, the call goes through the Firewall/NSG, and reaches the VM successfully:
SQLMI: “Found your hostname in Private DNS!”
VM: “Call received successfully—handshake complete!”
Both directions are connected and verified. The distributed transaction succeeds.
What This Looks Like in Azure
When configuring this in the Azure Portal or via automation (Bicep/Terraform), these correspond to three specific inspection points:
1. Windows VM Advanced DNS Settings
- Open Network Adapter Properties > IPv4 > Advanced > DNS.
- Select Append these DNS suffixes (in order).
- Add the SQLMI DNS domain suffix (e.g.
*.database.windows.net).
2. Azure Private DNS Zone
- Create an Azure Private DNS Zone (e.g.
corp.internal) and link it to the Virtual Network. - Add an
Arecord pointing the VM’s hostname (APP-PROD-VM01) to its private IP (10.1.0.5).
3. Azure SQL Managed Instance DNS & DTC Settings
- In the SQL Managed Instance blade, navigate to DTC Settings and enable the coordinator.
- Under DNS settings, ensure the custom DNS server or Azure DNS resolver is configured with the private DNS zone suffix (
corp.internal) added to the search list.
Key Takeaway
When migrating legacy systems with MSDTC to Azure, the most common pitfall is assuming that network connectivity alone is enough. Opening firewall ports handles the traffic path, but MSDTC is fundamentally a two-way handshake.
Once you recognize that both sides must resolve each other’s full FQDNs without NetBIOS broadcast, the setup becomes straightforward to explain and configure.
You've reached the outro of this track. Follow updates via RSS Feed, or explore more tracks in the Master Tracklist.